Tuesday, May 17, 2016

Israel National Trail Offline Maps

Lets get it straight - I have never thru-hiked the entire Israel National Trail (INT). I started it in September 2008, and did almost half of it (The northern half. The easy half), before quitting. I still hope on finishing my hike someday, either by hiking from Eilat to Arad (should take ~3 weeks), or by doing the whole thing from the beginning again.


The INT is ~1000Km long (~620 miles), and goes from the northern tip of Israel (near Kibbutz Dan), towards the Kinneret (Sea of Galilee), westwards to Mt. Carmel and the Mediterranean sea, south along the Israeli shoreline towards Tel Aviv, and then back east almost reaching Jerusalem (It's close enough to allow hopping over into the city). Further south it enters the dreaded desert section, which contains long and hard stretches without any natural water sources, crosses many beautiful areas like the Small, Big and Ramon Craters, and finally reaches the southern most city in Israel - Eilat, by the Red Sea.

A great source of information about the INT can be found in its Wiki page. There's a Trail Angels list, a list of Services along the trail, and a list of Water Sources in the Desert, all in English. There is also a lot of up-to-date information at the Israel National Trail Forum, including a discount to a good guide book in English.

Unlike long trails in the US, there are no fixed water caches in the desert part of the trail, so be sure to understand that the "Water Cache" entries in the Water Sources list are only popular suggestions for places that people normally use for their own water caches. They do not contain any publicly available water, and caching water there would take time and/or money. It is possible to hike the trail without any caches, but it will require some detours to nearby settlements, and some 2-day water carries. Please do not go into the desert section without considering the options, and knowing what you are going into.

I have created an offline map file along the trail, using data from OpenStreetMaps (OSM), and the Hiking Map Rules of the Israel Hiking Map. I changed the rendering rules to use the English place name labels (where available), so that the map will be more useful for hikers from abroad.

This map sample displays Hebrew labels, and is here to show you the quality of the map before downloading. There is an English version of that map available to download at the end of this post.

You can get an updated gpx file of the entire trail using this link. This uses a simple app I wrote that exports an OSM relation to a gpx file directly from their servers. That link uses relationId 282071, which is the Id of the INT, but you can substitute it with any other relationId you might be interested in, if you want to download an updated gpx of some other trail.

Disclaimer

All the data was used "as-is", and I do not take responsibility for its correctness. Please use your judgment when navigating along the trail (or anywhere else). Any errors or omissions I made in the process of compiling the files are my own.

Here are the files:

English
Hebrew

A detailed walk-through on how to use these files with Backcountry Navigator or Orux Maps can be found here.

Share and enjoy!

Monday, March 7, 2016

Continental Divide Trail Maps and Data

I have been playing around with CDT data over the weekend, and figured out I'd share what I made so that other people can use and enjoy it.


I had used several sources for my files -
I have imported all the data into Google Earth KML format, cleaned it up (removed Timestamp data, fixed some line styles), and split it all up to separate files for each state/layer/source. I then made some compilation files.

I have made a separate file for each state, to make it easier to use on mobile apps - New Mexico, Colorado, Wyoming and Montana. I have also created a single file for the whole trail.

I have also kept separate files for every state/source/layer combination, so you can also mix and match anything you'd like, from my Google Drive folder.

I have also used my Offline Map File Generator (OMFG) to generate offline map files for the CDT using USA Topo Maps source (Copyright:© 2013 National Geographic Society, i-cubed) for both Backcountry Navigator and Orux Maps (Both for Android).

This map shows the trail layer (with alternates), using the same map tile data I used for creating the offline files, so you can zoom in and out, and see what you will get on your Android phone. The main difference is that the offline files contain only the trail corridor, to keep the file size manageable.

Disclaimer

All the data was used "as-is", and I do not take responsibility for its correctness. Please use your judgment when navigating along the trail (or anywhere else). Any errors or omissions I made in the process of compiling the files are my own. The "Water Report" layer from the CDTC source is not updated, so do not count on the reports found there while hiking the trail. Visit the Water Report page for up-to-date information.

Here are the files:

BCNav (842MB)
Orux (877MB)
A detailed walk-through on how to use these files with Backcountry Navigator or Orux Maps can be found here.

Share and enjoy!

Saturday, October 31, 2015

Te Araroa Offline Map Files

A while ago a friend of mine asked for some help in getting maps for his upcoming Te Araroa hike, on his smart phone. I decided to create an offline map file for his use, and I am now sharing it with anyone else who might be interested.


I started out by researching the services offered by Landcare Research, and ended up using their TMS Tile servers for the Topo Base Map and a Text layer on top of it, to create a useful map of the trail. I wanted to use my own little app (OMFG) to download the tiles and create the offline map file, but unfortunately it can not handle creating a single map file from two tile sources (topo + text). So I ended up using the excellent MOBAC app, after making some minor code improvements.
On smaller zoom levels, the map seems a bit empty, but at the zoom levels most people would normally navigate (13-15), it shows all the elevation contours, streams and rivers, roads and place names. It seems like a good map to have handy, on such a long trail.

I later bumped into a post on Facebook that directed me to this site. The site offers offline maps for what I assume is the whole of New Zealand, in two separate files. One for each Island. Each file is around 1GB in size. That’s pretty big, though it’s still very useful. I looked at the data source for those maps, and found the Land Information New Zealand web site and web services, which offered a different set of map tiles than the ones I used for my first file. This time, I was able to use my own app to create an offline map file that uses their Topo250 data for zoom levels of 0-11, and the Topo50 data for zoom levels of 12-15 (I chose the grid-less option, to remove some clutter from the map).
Here is a view on the data I used for my files. You can switch between the two sources by hovering over that blue button at the top right of the map. Notice that this interactive map will show all of New Zealand, so you can zoom in and out anywhere you’d like, on either island. But the offline files only contain the trail corridor itself (and ~1.5Km around it). You can switch the layers to see the difference in the maps themselves. Make sure you check out the higher zoom levels, to really decide which one you prefer.
In my opinion, the LINZ map looks a bit better than the Landcare one, but If I had to chose, I’d take both of them with me, and alternate according to my needs. Each file is 478MB, so I was able to get a good size for the entire TA.
The only thing that is bothering me with those maps, is that in lower zoom levels (check out around 8-11), the trail corridor seems a bit too narrow. I thought about maybe adding the whole of New Zealand at those levels, just to get a better understanding of your whereabouts in comparison to places a bit further away from you. If there is a need for such an improvement, I can give it a shot. Don’t hesitate to ask.

DISCLAIMER:

Please double check that the files contain all the mapping data you might need while on the trail. Mistakes might have been made (and probably were made) during the file's creation, so don't rely only on them on your hike. Have backup maps in case your phone's power run out, or the files don't contain a required section. Use your own judgement.

Here are the files:

Both versions follow the trail corridor defined by the TeAraroaTrail_asTrack.gpx file from here. I am sure you can use the other versions on that site, as they should all follow the same route.
Land Information (BCNav) (474MB)
Landcare Research (BCNav) (472MB)
Land Information (Orux) (474MB)
Landcare Research (Orux) (390MB)
A detailed walk-through on how to use these files with Backcountry Navigator or Orux Maps can be found here.

Monday, February 2, 2015

My Resupply Strategy

I started writing a full account of my resupply stops along the trail, with comments about the selection and variety different places had. The list grew longer, and I think that most of this information can be found on Yogi's excellent book. It was also not very interesting.
Instead, I'll just post about the different locations I mailed myself packages, which will make it all shorter and to the point.

For residents of the US (= the majority of hikers), a friend/family member who can ship packages along the trail might be an option. I preferred to rely just on myself along the trail. In general, I tried avoiding sending myself packages whenever I could. Most trail towns had decent resupply options, and I only sent packages when (I thought) I had to.

So, here is a list of places I bought food in bulk, and mailed it to myself further up the trail:

My Bounce Box, and first package to Ziggy and The Bear

San Diego

In San Diego I bought some food, and sent it ahead to Warner Springs (mile 109.5) and Ziggy and The Bear (mile 210.8). In retrospect, I think there is no need for a package in Warner Springs - the community center had a reasonable selection over there, with the prices being a bit higher than normal stores. I would have definitely managed to buy what I needed, If I didn't have a package waiting for me there.

At Ziggy and The Bear it might be a bit harder to bu food, though it is possible to get some basic stuff from them (if available), or try to hitch out to a supermarket if all else fails. Still, a package there was very helpful.

Agua Dulce (mile 454.5)

At Agua Dulce's Hiker Heaven (which seems to be closed next year. UPDATE: re-opened for 2016), I joined the shuttle heading out to REI and WalMart, and bought supplies for the Sierras. I sent out a package to Kennedy Meadows (mile 702.2), Vermillion Valley Resort (mile 878.8) and Toulumne Meadows (mile 942.5).

The package at Kennedy Meadows was helpful (though it costs $5 to get it from the store, if I remember correctly), but the store does have plenty of hiker supply selection. The price is high over there, but I believe it is possible to rely on it, and skip the package.

The VVR package is similar. The store does have some selection, though it seemed like it has fewer items, and the prices are steeper even in comparison to KM. The price of getting a package there was $20, so maybe with the cost of sending it (~$17) it would be more cost-efficient to just buy stuff there. Having the next stop (Mammoth Lakes) only 1.5 days later, makes it easier to make do with whatever they have in the store.

The Toulumne Meadows package was not there when we got to the store, and was waiting for us down in Yosemite Valley. Luckily, we were going to the valley anyway. The general store had plenty of resupply options, and so did the stores down in Curry Village and the Housekeeping Village. So there's no special need to send a package over there anyway.

To conclude - All 3 packages from Agua Dulce can be skipped, if you don't mind paying a bit extra for your resupply, and maybe have a smaller selection to choose from.

South Lake Tahoe (mile 1092.94)

From Tahoe, we've made packages to Sierra City (mile 1197.6) and Old Station (mile 1377.6).

The small store in Sierra City might be enough for resupply, but the selection is not too impressive. Same goes for the store in Old Station. Both places might work out for you, but having the packages was a bit easier for us.

Ashland (mile 1727)

From Ashland, I bought supplies for most of Oregon, sending my packaged to Mazama Village (mile 1829.3), Shelter Cove (mile 1912.7) and Timberline Lodge (mile 2106.3).

In Mazama Village, the store has some options, but I was happy I had my package, since there weren't that many vegetarian meals around. Same goes for Shelter Cove (I had a toaster oven pizza there for dinner). Timberline Lodge didn't have any resupply store around it (Though the AYCE buffet was filling and tasty). So all in all, I was happy I had those packages.

Cascade Locks (mile 2155)

At my final major stop, I got a (very helpful) ride with Rock Ocean, and bought my Washington supplies at the Walmart and Safeway in Hood River. The Walmart sucked, by the way. Safeway was much much better.

I made packages to Trout Lake (mile 2237.5), White Pass (mile 2303), Snoqualamie Pass (mile 2402), The Dinsmores (mile 2476), and Stehekin (mile 2580.2). A lot of packages, for a lot of money (~$17 * 5 + 1 bounce box).

The small store in Trout Lake might have been enough for me, and I haven't really checked the offerings at the gas station in Snoqualamie Pass, but having those packages did make everything simpler.

Bounce Box

I used a bounce box along the trail, mostly to ship ahead items I might need further down the trail, and map pages I didn't want to carry with me. I sent it ahead many times, until I finally gave it up in Ashland. I did send a smaller box from there to Bend, and then to Cascade Locks, and to Seattle. Almost everywhere I had the box shipped to, I opened it, and then payed to have it shipped ahead, so it wasn't very cost-effective (I think I bumped it for free only once, in Wrightwood).

For the box itself, I used a 5 gallon plastic bucket I bought at the Walmart in San Diego.
This is a quick rundown of all the places I had the box shipped to, in case anybody wonders:

San Diego → Idyllwild → Big Bear City → Hiker Heaven → Kennedy Meadows → Lone Pine → Mammoth Lakes → South Lake Tahoe → Quincy → Mt. Shasta City → Ashland → Bend → Cascade Locks → Seattle

Saturday, January 10, 2015

PCT Offline Maps

Before hiking the PCT, I got hold of a very nice and comfortable file containing all the maps along the PCT. I got it from a friend, and I don't know how he got it, but it was very helpful indeed, especially when I used it along with BackCountry Navigator and the GPX files from Halfmile's site.
The past week, I've been fiddling around with creating a similar file myself, so I can freely post it over here, and distribute it to anyone who might want it. This post might get a bit too technical, so if you are here is just for the file,

It's in here (637Mb)

(Download on your home computer, or via Wi-Fi) Here's how to use the file as a map source in BackCountry Navigator:
  1. Copy it into your Android phone, under the bcnav\atlases folder (not sure exactly on how to do it on iPhone, but I assume it can be done).
  2. Inside BackCountry Navigator, tap on the "Layers" icon at the top
  3. Tap on "More Map Sources..."
  4. Tap on "Use Mobile Atlas" and select the file.
You will now have good quality topographical maps all along the trail, from Mexico to Canada. All you have to do now, is import the GPX files from Halfmile's site, and see the trail, side trails and waypoints, directly on the map.

And now, to the technical bits -
At first, I looked around the internet for the source of the file I originally had. I quickly found OpenStreetMap and OpenCycleMap as available map tile resources (though they do not freely allow bulk download of tiles). The OpenCycleMap project does show elevation lines, and would be appropriate for navigation while hiking.
I needed to go over the whole trail (a collection of lat/long coordinates), and for each such coordinate, download the appropriate map tiles, on different zoom levels (zoom level 0 is the entire world. zoom level 15 is a very well detailed map of about 4.7 meters per pixel, or 5.2 yards per pixel). Since the trail is continuous, many coordinates will appear on the same tile, so I'll only have to download tiles I haven't downloaded before.
Searching some more on the internet, I found the excellent free application Mobile Atlas Creator (MOBAC), which is doing exactly what I was looking for - it can take in data from GPX files (but not Google Earth KML/KMZ), select a map source, and pick all the needed tiles to download from the source. Then, it can create an Atlas, for different navigation applications. It already has a setting for BackCountry Navigator sqlite format, which was just what I was looking for. But if anybody here needs the offline file for a different mapping application, I will gladly help with creating it as well.
I had one major problem with using MOBAC - it did not contain the tile server source I was looking for.
Searching around some more, I ran into CalTopo, another nice site which allows different tiling servers to be displayed inside the browser. I finally found the source I was looking for, while looking around in their different options. It was ArcGIS USA Topo Maps. Success!
That was the bit where I started writing my own code, and putting up a simple application that reads a KML/KMZ file, calculates all the tiles it needs to download, and downloads it all from a selected map source. I had fun writing this app, and I think I will still improve upon it. But two days ago I realized I can just add this map source to use in MOBAC, and it deal with the entire downloading and packaging the result for me.
So yesterday and today I did just that. I let MOBAC do the heavy lifting. Another annoying thing in MOBAC is that it only lets you select tiles along a single track every time, so I downloaded the code, and changed it a bit to allow adding multiple tracks at the same time. It made making the Atlas much easier.
I kept getting a huge Atlas as a result, though. My original file was ~500Mb, and I kept getting files that were more around 4000Mb. That's quite a big difference. I kept fighting with it today, until I finally realized that MOBAC was downloading the tiles as JPG files from the tile server, and then converts them into PNG files, which increases their size (And not their quality). After realizing that, I've finally been able to create this file here, for the enjoyment of every future PCT hiker!
I will make similar files for other trails as well (AT, CDT, JMT, for start. And also the INT and some trails in Europe, but with different map sources). I will also gladly help anyone needing those files to be in different output format, for other mobile navigation apps. Don't hesitate to ask!

Saturday, January 3, 2015

Useful (and not so useful) Android apps for the trail

A long time before I started my hike, I decided I'll carry my Nexus 4 phone with me on the trail. I knew it will come in handy both as a phone, to keep in touch with my family, and as a way to access the internet.
While my specific phone is not the most recommended model for the task (It's battery is really not up for the challenge), I did enjoy it for many different uses and scenarios. Here is a list of the apps I used on the trail, along with a few that were disappointing or just weren't used that much.

Amazon Kindle / NOOK

I personally did not read any eBooks on the trail, but for anybody who thinks about carrying a Kindle or NOOK device with him, this is a better option, in my opinion. The screen is smaller, and the battery life is not as good, but it does the trick.

Audible / NOOK Audiobooks

I really got into listening to audio books on the trail. And Audible offer a free first month, in which you can just get 1 free book. Good deal.
Usually before long climbs, I'd put on the book I'm currently listening to. I must admit - the 2nd book I took was total crap. But it still helped me during long days.
Just make sure you do cancel your account after downloading your book - they are very persistent with their "are you sure?" dialogs, and I managed to miss it and ended up paying for one extra month. The base price is ~$15, but I got an offer of ~$7.5 for several month, in my (finally successful) cancellation process. Also a good deal.
I never tried NOOK Audiobooks, but I would guess it's quite similar to Audible.

BackCountry Navigator TOPO GPS

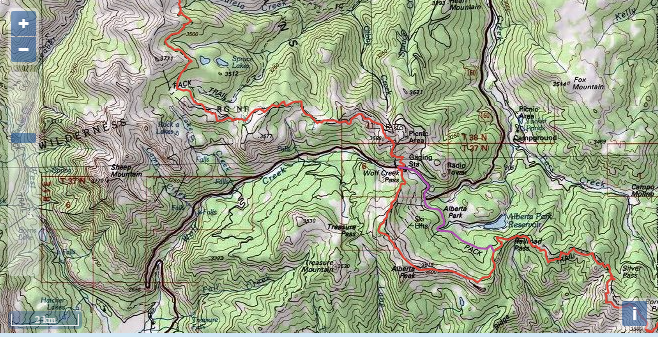
Now we are in the big league - this is one of the most useful apps I had. While the link directs to the trial version (I think it's good for a week), the full version does cost a bit (I think it's $15. Is it $15?). I had file that contained full topo maps of the entire PCT corridor, for offline use (I'll post it in my next post). That, along with Halfmile's GPX file was all I actually needed to hike the trail and stay on it. After getting a GPS fix, I could immediately see where I was in relation to the trail. It was really helpful in the High Sierra passes, where Idan led Yair and me safely down snow covered trails. 
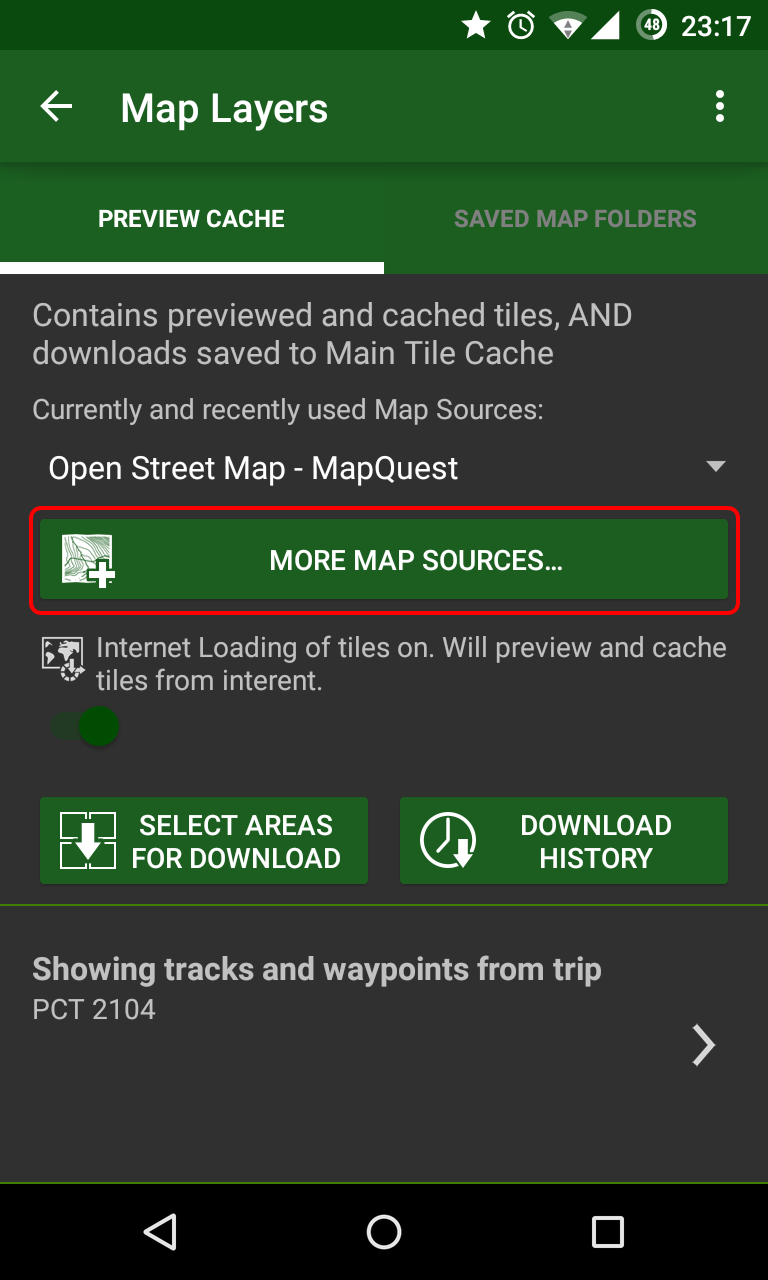
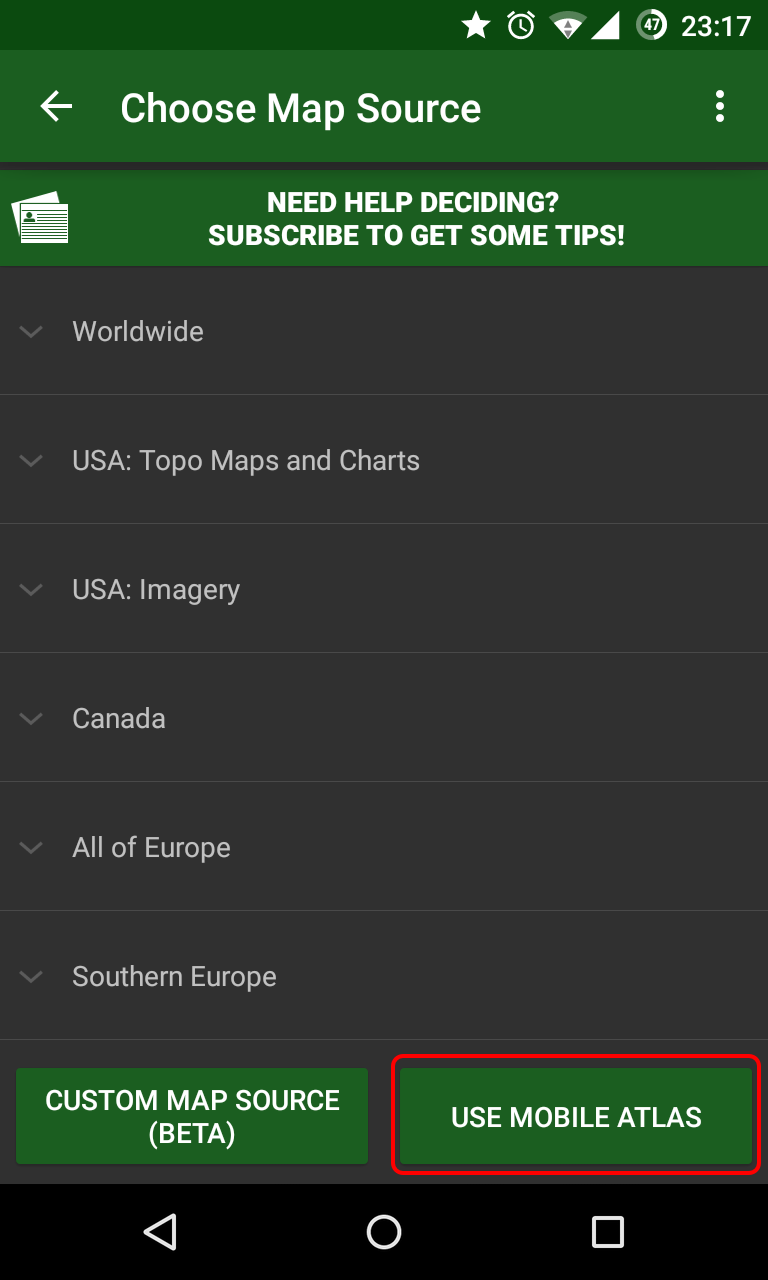
There are other, similar apps, such as Orux Maps, which might also do the trick. Highly recommended, either way.

Blogaway for Android (Blogger)

I used this app for most of the way, just to write my blog posts from the trail. After starting with the official Blogger app (next in line), I found this app to be much much better. It still had plenty of bugs and errors.
I'd usually write my blog posts in the evening, with no cell service around. At first, I assumed the app will remember the time and location of where I created the drafts, and keep this data for when it actually uploaded it to my blog, when I got into town. I found out it was not the case, and at first I had many mismatched blog entries, with wrong dates and locations. I discovered I should "schedule" each draft I'm writing, to the current date of writing it (effectively scheduling it to the past), so that the upload later would post it with the correct date.
Many times, while in town, on cell service, or some local Wi-Fi, I had to kept trying again and again to upload my posts. It would fail uploading a bit too much for my taste. I also had many occurrences of missing uploaded photos. But it was still better than the official app -

Blogger

A terrible, terrible app. Don't go near it. This app is not maintained and is buggy as hell. No solution to writing posts while being offline, uploading posts sometimes result in broken images, trying to edit current posts causes the app to crash. Completely useless. Stay away.

DropBox

I used DropBox to backup all of my photos from along the trail. I had it set to automatically sync every photo on my phone up to my Pictures folder, and occasionally had my wife back home copy it all outside, to free up some space. The photos I took along the trail are one of the few things I always worried about loosing (and I lost about a week in the Sierras.. damnit), and being able to backup them on the go was very nice.
I also used DropBox to get an audio book from my wide (The Brothers Karamazov, in case you were wondering). That was also very simple and nice.

Facebook

I guess there's no need to introduce Facebook. It was just a good way to keep up to date with recent changes and information on the trail, as well as a nice way to keep in touch with friends and family. It's useful, occasionaly.

Google+

While it hadn't really caught on as a social network, I still used it to backup my photos as well, as a backup to the DropBox one. It's just as simple as DropBox, and it's just one more place where my photos were kept safe.

Google Camera

A nice camera app from Google. It does the trick, same as most other stock or non-stock camera apps for Android. I really liked the Photosphere option, and I took such spheres in the high passes of the Sierras, but that needs some matching hardware, and I think it won't be available on every Android phone. Anyway - I used a separate pocket camera for most of my photos, and rarely resorted to using my phone. I still think this camera app is nice, though.

Google Drive

Google Drive, along with its accompanying apps of Docs and ;Sheets, was helpful to keep the various pdf and documents on my phone, even with no data reception at all. In Southern California, I kept the Water Report available for offline view on my device, and only had to occasionally let it automatically update itself when in towns. I also had my PCT Planning spreadsheet handy, even though I was not following my plans to the letter. It was handy many times.

Google Play Music

As a music app, this one is nothing special. It has all the normal bells and whistles, like searching for a specific artist or album, and shuffling the results.
The basic, and free, service it offers, is the ability to easily upload all your music library back home (up to 20,000 songs) to the Google cloud, and then listen to it using the app, from wherever you are. A data connection is necessary when listening to new songs, but it automatically keeps songs on your device, for offline listening later, and you can also select albums and songs to be actively downloaded to your phone.
I also really like the paid service, currently called Google Play Music All Access, but it is actually the same service as the newer YouTube Music Key, which allows you to add any song or album in the Google Catalog into your album, to listen to while online, and to download for offline use. So basically - limitless music access. Awesome.
Every few weeks, when I got into town, I cleared the music cache on my phone, and started selecting a new and eclectic music selection for my next section. Towards the end, I selected many albums I've never listened to before, by artists I heard about, but never actually got to know. It was very nice, having the option to easily get so much content like this.

Google Voice

Using Google Voice, as someone coming from Israel, it was much easier for me to switch between T-Mobile and AT&T, while keeping the same Google Voice number so that people could reach me. It took me some time to figure out how to do that, but it is a nice trick.
I also used it extensively to call to Israel, while paying for a non-international plan on StraightTalk. With the introduction of the Hangouts Dialer, every Wi-Fi access point becomes a way to call the outside world (you'd be surprised how many places have Wi-Fi but no decent AT&T cell service), and currently, Voice calls to many US phones is also free. So it's worth it.

GPS Status & Toolbox

This app is a nice one to have when trying to get a GPS fix, as it tells you how many sattelites are currently visible to your phone, and you can get mad and annoyed at your phone, staring at the screen, and waiting for it to finally get a fix. It is also very useful in that it can automatically download AGPS data (Assisted GPS data), when you have cell service and a data connection, that greatly speeds up getting a fix. It is recommended downloading this data whenever you can, so that in those far out places you try to get a fix you will have the most recently available data.

Halfmile's PCT

Another must have app. Or at least, one at the top 3 I used on the trail. While using BCNav and my offline maps is all one needs to keep on trail, I rarely actually had to use it (and eat up my battery on getting a GPS fix) - I just used Halfmile's app instead. I was worried the lack of a map view in the app would be annoying, but I can now say it contains everything that a hiker needs. Knowing where you are, and how far it is to any other location on the trail. Simple and elegant. I also really liked the cumulative elevation gain and loss info between locations (even though they are not always accurate), and have it used extensively to plan ahead my next section or sections. An amazing app, and I'm sure the 2015 edition will be even better and more accurate, after Halfmile himself logged the entire PCT this year. Thanks again to Halfmile and White Jeep for their hard work on making this app available.

Hangouts & Hangouts Dialer

I mostly just used Hangouts to keep in touch with my family back home. I like it better than WhatsApp, but I guess they both work similarly. It's just a simple and easy way to keep up with people. The Dialer add on though, is quite awesome. It only came out when I finished the trail, but it was very handy on the bus ride from Manning Park to Vancouver - I had no data plan for Canada, but the bus had free Wi-Fi, so I was able to use the Dialer and my Google Voice account to call Israeli cell phones easily. It worked like a charm. If it were available for me all though the trail, I might have skipped getting a phone plan entirely, and only relied on Wi-Fi access to call home. Maybe not. But it's a very nice feature.

Panasonic Image App

Not very recommended, unless you have a matching Panasonic camera with Wi-Fi access. But once I got my new camera and started using it, it was much easier for me to transfer the photos from my camera to my phone, and from there, using DropBox and Google+, backed up in the cloud.
The app itself is not exceptionally good, only allowing up to 10 photos to be transferred between the camera and the phone in each batch. It's quite a pain, when you've got 150+ photos you need to send over. But at least I had a way of getting those photos.

PCTHYOH

A simple app that allows you to cache many different PCT resources, including Halfmile's maps, the Water Report, and other such resources. I never actually used it, but I met some hikers who really liked it.

Guthook's PCT Guide / Guthook's Tour of the PCT

While being "faithful" to the Halfmile's app, many other hikers I've met used Guthook's guides on the trail. They cost ~$6 per section (5 sections for the entire PCT), but they seem to be worth it. The data, at least during 2014, was probably a bit more accurate, with more water sources and camp sites available on Guthook's. I would imagine the 2015 versions will be more similar in that regard.
The Tour of the PCT app is free, and is meant to be used for planning the PCT in advance. For a full data set inside the app though, it does require an in app purchase of several dollars.

Better Diary

I only discovered this app recently, and have never actually used it, so this is just a suggestion.
Before the trail, I mostly wanted a blogging platform/app for my own uses, so I will be able to remember my time on the trail. The benefit of letting the world know of my adventures was a nice bonus, but not the main thing I was looking for. Recently, I found this nice diary app, which seems to be doing just what I was looking for - It allows you to easily write daily posts, automatically adding the location (and current weather - I guess this won't work as well with no data service). You can also share your diary with other people, making it into a simple blogging platform, at least for close friends and family.
I don't know how well it all works while being offline, but I would definitely recommend giving it a try.

Sunday, December 28, 2014

Confessions of a Thru-Hiker

I started my hike in an attempt to hike the entire PCT. Being the anal person that I am, I meant to do it all, without skipping a single step. Yes, I am one of those stupid purists who gets a ride into town from one side of the highway, then gets back to that same side on the next day, to hike on from the exact same spot.
However, after a while I gave up. I wasn't enjoying the trail that much, and I had thoughts about quitting. When the opportunity arrived, I decided I don't care that much for the trail anymore, and I should just do whatever I want to, instead of forcing myself into following stupid rules, for no logical reason at all. So I started skipping.
I wasn't skipping whole giant sections, hitch hiking up and down the trail. Not that there's anything wrong about it. But I occasionally let myself off easily. I admit.
After the Sierras, when I decided (again) that I want to keep on, and hike the entire trail, I decided I'd try to go "pure" again. I knew it doesn't matter. It never did, actually. All that matters is whatever I felt matters. Being pure now won't change me being not-pure before, nor should it. I just decided again I wanted to try it.
I started making lists in my head, about all the different miles I had skipped. I figured maybe somehow I'll do them again someday. I don't expect I will, now. But I wanted to write down all the trail miles I haven't walked, with the reasons/excuses I gave myself every time. Some are better than others.
I got up all the way to the closure
162.64-178.00 (Cedar Spring Trail to Tahquitz Peak Trail) - The famous ;Mountain Fire Closure. The trail is closed between those two locations, though most hikers get off the trail at Highway 74 (mile 151.86), and either hitch into Idyllwild, or road walk all the way there on the highway. From there most climb up to San Jacinto on the Devils Slide Trail on mile 179.40. I hiked on north from Highway 74 with the intention of getting down the side south-western side of the mountain at the Cedar Springs Trail junction, and then road walk on the highway up to Idyllwild, and climb through Tahquitz Peak back to the PCT. My plans got foiled when I twisted my ankle right before I got to the highway, and I hitched into town, rested there for two days, rested two more days at the ADZPCTKO, and then got a ride back to Idyllwild and limped up to Tahquitz Peak. I entertained a thought of getting back to the road walk, on my way back from the Kick Off, but at the end I decided I would skip that boring and dangerous section.
252.06-266.04 (Onyx Summit to Highway 18) - I took a zero day at Ziggy and The Bear, feeling really light headed and not up to hiking, and Idan went on without me. We were supposed to meet again in Big Bear, in 4 days. After hiking two days alone, and feeling really depressed and done with the trail, I suddenly came upon Onyx Summit. I was surprised to see a road leading to Big Bear, and even though I planned on hiking ~6 more miles, and then reaching town on the next day, I changed my plans and headed into town from there. I had cell service, and talking to Idan I realized he was already zeroing in town, and would leave tomorrow. So if I'd take another day, I'll have to keep on hiking alone. I spent a boring and lonely evening in Big Bear Lake, and met up with Idan and headed out from the next road crossing on the next morning.
386.25-398.19 (Islip Saddle to Highway 2, 6th crossing) - This one was around the Endangered Species Closure. The official trail is closed from mile 390.30 (Eagles Roost) to mile 394.30 (Burkhart Trail), but the official detour starts here, at 386.32, and goes around for 20.22 miles (instead of 8 miles on the trail), all the way to Burkhart Trail. There is also an old alternate, that loops right around the actual closer, and is only 5.44 miles.
When we got to the road crossing right before the official detour, we were planning on hitching back into Wrightwood (After spending the previous night there), and have already called a local trail angel that will let us crash at his place for the night. Our plans weren't met with success, as we were trying to hitch on that deserted road for ever, and nobody stopped for us. Finally, as the sun went down, we made camp at the rest area over there, and crashed.
4 happy hikers, after cheating the trail a bit
The next morning, we wanted to at least get a ride to the end of the closure (thus skipping both the official, 1 day extra, alternate, and the old alternate). We didn't have any hitching luck in the morning as well, until we saw Kyle and Snail Trainer coming down to the road. They spent the previous night at Little Jimmy Campground, and met a weekend hiker named Barbara, who agreed on taking them around the closure. We joined in on the ride happily. Very quickly we got convinced to hitching all the way to the next road crossing at 398.19, instead of getting of at Buckhorn Exit, and hiking an additional 2.16 miles just to get back on the trail. As a consequence, when we finally crossed the 400 miles marker, I didn't feel like it was much of an accomplishment.
454.50-456.65 (Exit for Hiker Heaven to Unpaved Road) - After spending a nice zero day at Hiker Heaven, we took our time on heading out of there. I think we left a bit later in the morning, but still before noon. Donna arranged for a ride to the trail, just to save us the short walk down the hill. But again - we were quickly persuaded to ride all the way down to where the trail finally leaves the paved roads around Agua Dulce. This was a bit pointless, but I don't think we missed any special sights on that road walk, and I was already in a "whatever" kind mood about being a purist or even completing the trail. So - "whatever".
A schematic map of the Powerhouse Fire Detour
478.23-517.59 (San Francisquito Canyon Road to Highway 138) - This not-so-little skip was around the Powerhouse Fire Closure, which starts at mile 487.23 and ends at mile 517.59 (Or maybe at mile 510.95 on Pine Canyon Road - some people who did the road walk got back on trail over here). Walking the road around the closure is a long, 20.3 mile, walk (or a 19.2 mile walk to Pine Canyon Road, and another 6.64 back on the PCT, up to Highway 138). So we just skipped it.
Hitching a ride into Hiker Town
558.51-566.44 (Tehachapi Willow Springs Road to Highway 58) - This one was one of the most pointless skips I've made. No special reason to do it, other than how easy and inviting it was. We went into Tehachapi on the first road crossing (Willow Springs Road), zeroed there for a day, and headed out to the second road crossing (Highway 58). Thus - saving us about 8 miles of trail I'll never get to see again... Stupid of me.
766.33-767.00 (Whitney Spur Trail to John Muir Trail) - This is a short little bit we skipped, because we left the PCT and headed up towards Whitney on one trail, and then later got back to the PCT while hiking the the JMT from Whitney, which was a tiny bit further north on trail. I don't really consider this to be much of a skip.
View back towards Bullfrog Lake, from Kearsarge Pass
788.47-789.08 (Bullfrog Lake Trail to Onion Valley Trail) - Another tiny bit. We hiked out towards Kearsarge Pass and into Lone Pine on one trail and got back on another one, thus skipping another 0.5 of PCT.
The Devil's Postpile
907.24-909.02 (Devils Postpile Alternate) - After leaving Mammoth Lakes through Red's Meadows, the trail goes by the famous Devil's Postpile. It's the same distance on the PCT and on the alternate, and I figured I might as well see it, since I'm that close. So we took it. It was nice enough.
909.02-922.92 (JMT Alternate) - Right after getting back to the PCT from the Devil's Postpile alternate, the PCT and JMT split for a short section. Here, also, both alternates are almost the same distance, but the JMT section is supposed to have some nicer hikes around lakes, and is generally considered more beautiful. I wouldn't know - I just hiked the JMT. It was a nice enough section, and we had a lovely day.
940.84-942.50 (Tuolumne Campground Trail to Highway 120) - Since we were planning on heading down to Yosemite Valley, to finish up the JMT with Yair, we cut over to the Tuolumne Meadows campground when we reached the intersection. Two days later, when we took the bus up from the valley, and back to the store, we kept on hiking from the highway.
I think it was worth the detour...
1831.54-1843.62 (Crater Lake Alternate) - I don't think there is any PCT hiker who doesn't hike along the Crater Lake Rim Trail. So I don't really need an excuse here. It's the de-facto PCT. So much so, that the mileage marks on this detour, and further up the trail, take into consideration hiking on the Rim Trail, and not hiking on the official, equestrian trail.
This wasn't that impressive, in my opinion. I kinda reminded me of Amicalola Falls, near the start of the AT.
2117.22-2119.33 (Ramona Falls Alternate) - Another tiny alternate, that goes by Ramona Falls. The distance is identical to the official PCT, and I think the trail was changed here to bypass the falls, mostly because of equestrian hikers. I figured that since I'm going to hike the Eagle Creek Alternate on the following day, I can be just as "unpure" on this day, and see some more nice falls. I wasn't too impressed with the falls, at the end.
And the famous Tunnel Falls
2138.06-2154.70 (Eagle Creek Alternate) - Another de-facto PCT. Going down towards Cascade Locks (And the Oregon/Washington border) on the Eagle Creek Alternate is what "everybody" does. The giant waterfalls are very special, and give a nice touch to the trail, before entering the final state. Don't miss it.
In total, I didn't hike over 144.03 miles of the trail, which is %5.41. If I only include sections I hitched around (as opposed to hiking on alternates), I skipped 90.72 miles (%3.41). Maybe I'll come and stitch it all up, some day...